Showing posts with label TIPS & TRICKS. Show all posts
Monday, 30 September 2013
WHAT IS SITEMAP | How to Submit Sitemap for you Blog to Google Search Engine-uploading XML
If you are verified owner of Google blog and want to submit
a site map of your Google blog to Google search engine, this post will really
help you. Submitting a sitemap of your website is an important tool of Search
Engine Optimization. But many users do not know how to upload XML file to the
root directory of blog’s domain. Here is the procedure to do this:
- First of all create a sitemap of your site in .xml format on http://www.xml-sitemaps.com for free. Follow their instructions and download generated sitemap.xml file which is your sitemap ready to be submitted to Google.
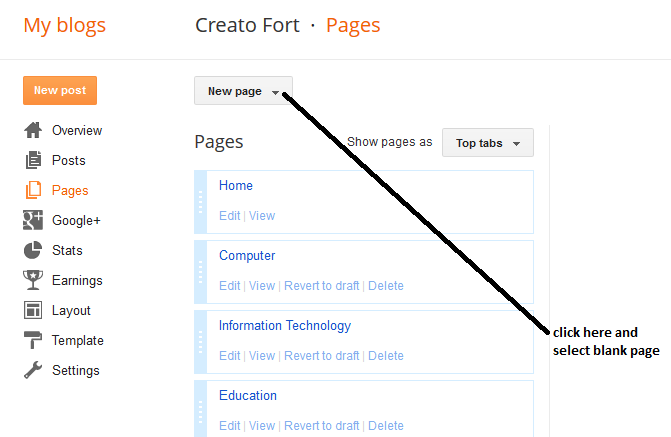
- Now go to your blogger dashboard and create new page in your blog. As shown in the picture below.
- Give your page the title of “sitemap.xml”
- Now click on “HTML” as shown in picture.
- Now go to the file “sitemap.xml” in your computer where you have downloaded it.
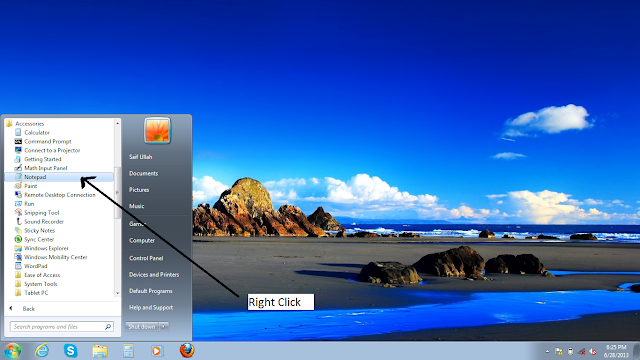
- Right click on this file and select “edit”
- This file will open in Notepad of your PC.
- Copy all the content in it. Simply click in the text and press “CTRL+A” then press “CTRL+C”
Now the contents of the file have been copied
- Paste these copied text into your page which you are creating on your blog, as shown in above pictures and click “publish”
Your sitemap has been uploaded to the domain directory of
your blog.
- Now go to Google webmaster tools and follow the instructions as given in the picture below
Now you will see that your "home url" is already written, just add "sitemap.xml" in the box and hit "submit sitemap, as shown in the picture below.
Your sitemap will be submitted to Google in two or three seconds.
Security Certificate Error Fix the Problem of Browser Showing
It
happens sometimes that your internet browser
show an error saying “security certificate expired” or “ security
certificates
are not valid or invalid” or “not trusted certificates” or something
like that. Sometimes it says that it is not a trusted website. So you
are unable to browse the internet
in any browser installed on your computer. This is really surprising and
irritating for those who do not know the solution yet.
This type of problem with server security
certificates is often due to
incorrect time and date on your system.
If you receive this message from your browser, just
see your time and date on your system and set your time and date to today. Check
the year and month especially.
This happens usually when your system lose time and
date due to any reason or when you install fresh windows and do not set the
date and time before browsing the internet.
So, that’s all.
Shutdown Your Computer Automatically After a set Time Duration WIthout Software
Want your windows to shut down at the set time? Want a timer for shutdown?
The method works on both windows XP and windows 7
Perhaps you would like to be away from your PC while some
programs are still working on it. And you may get late and you want that your
windows should shut down after a specific time. You may allow your kids or
friends to work on your PC till a fixed time. You may be going to sleep and
your kids or friends may not know how to shut down the system after watching movie.
Here is an easy
Press Windows +R key on your computer.
A window will open asking you to enter the name of the
program you want to run. In bow aginst “open” like that in picture below:
Enter "shutdown.exe -s -t 30" as whown in the picture below and hit Enter
"30" is the number of seconds after which windows will automatically
shutdown. You can write the number of seconds as per your need. For
Example, you want your windows to shut down after an hour, you may type "shutdown.exe -s -t 3600"
there is single space between "shutdown.exe" and "-s" and "-t" and "30"
As soon as you press enter, the time will start counting back.
And suppose you press enter and after that you want to cancel the shutdown schedule?
It is again quit simple and easy.
A gain press "Windows Key +R" and now enter the following text and hit Enter
shutdown.exe -a
Your shutdown schedule will be cancelled.
How is it? :)
Free Download Internet Download Manager Full Registered Version
Internet Download Manager, popularly known as IDM, is the most desirable application among
internet users for downloading videos and other files from internet. IDM is the
most favorite software of the majority of the Internet users for the following
distinguishing
features of it:
features of it:
- · Resume Capability
- · Re-establishment of broken, interrupted and damaged connections
- · Fast and smooth downloading speed
- · Categorized download storage folders for various kind of files
- · Easy to use
- · Simple and clear user interface
With all these loveable features, IDM stands out in all other
applications for similar purposes. But, for the disappointment of its lovers,
IDM is only available for 30 day trial period for free on internet. The registered
version is charged which is not affordable for many of users.
Here is a Registered copy of IDM which I have registered after a tiresome crack on internet, reading various articles and tips and tutorials....
Download registered IDM
Download ............. :)
Enjoy........! don't ever update it when its asks to be updated; just cancel or postpone updates.
Note: Extract .zip folder with any compression and extraction software like Wrar etc. and Open "IDM Registered by Saif Ullah" and enjoy....... Good Luck
Here is a Registered copy of IDM which I have registered after a tiresome crack on internet, reading various articles and tips and tutorials....
Download registered IDM
Download ............. :)
Enjoy........! don't ever update it when its asks to be updated; just cancel or postpone updates.
Note: Extract .zip folder with any compression and extraction software like Wrar etc. and Open "IDM Registered by Saif Ullah" and enjoy....... Good Luck
How to Download Videos from Internet without using any Software
There are many programs which allow
the internet users download files and videos from You Tube and other websites. Internet Download Manger, Popularly known as IDM, is one of the widely used programs to download
videos and other files with speed and excellent resume capability. But all of
us know IDM comes with
30 days trial version and after the trial period expires, IDM cannot be reinstalled without installing a fresh copy of windows on your computer. All other applications, being used to download videos and files from internet, either have insufficient functioning or these do not come with resume and restoration capabilities unlike IDM.
Here is an easy way to download videos with Firefox add-one.
You need the following things:
- · A latest version of Firefox Browser installed on your PC
- · Internet connection
Open Firefox browser and check whether your internet
connection works.
Click on Firefox drop-down menu and select Add-ons.
OR
A new page will open showing options for Add-ons and all available Add-ons for your current browser.
In the search box on the right top of the opened window,
type “downloader” and hit enter.
All Add-ons relevant to your search query will appear.
Select “Flash Video Downloader” from the list as shown in
the picture.
Then select “Install” or “add to Firefox” or whatever the
option is available to add this Add-on to your browser.
You will see that is will be quickly installed. Then restart
your browser and the Add-ons will be working.
It is quite easy to download vides with this Add-one. When a
webpage contains a video stream, the Add-ons will automatically capture it and
the video will be available to be downloaded with single click.
Has this article solved your issue?
Use This Method Instead for saving Youtube videos without any download software..
Set a Slide of Desktop Backgrounds to your Computer (Windows 7)
You want your desktop background to change automatically
after sometime. It is pleasant to have desktop background changing after a
short time. It imparts a good impression on you working and eyesight as well. Ever-changing
desktop wallpaper gives you more focus for your work and it decreases the
pressure on your eyesight. You will feel the difference yourself if you set a
slide set to desktop backgrounds to your computer. You can spend more time on
that computer working more efficiently; not getting bore so soon, not being
irritated of
So, here is how you can set a slide of your desired
wallpapers to your computer. Moreover, it is single click process to change
your wallpaper at anytime, right from your desktop screen.
First of all make folder of your favorite wallpapers; you
can add your favorite landscapes, abstract themes, snaps of your college party,
shots of your tour to your favorite place or whatever you like the most. Keep
this folder at a location you feel better for.
Now get back to your desktop screen. Right click on empty
screen and choose “personalize”, at the end.
Now,
click on “desktop background” as shown in the picture:
Then
proceed and choose your folder by clicking on “browse” button as shown in the
picture:
Brows for the folder and select it
and click “Ok”
You are done.
Whenever you want to change your
desktop manually, just right click on desktop screen and choose “next desktop
background”. That’s all.
Save Battery Power of Your Laptop
You are working on your laptop on
battery power and want you the battery of your laptop gives you more working
time on it. Perhaps you are out of home, on a place where there is no power
supply, or you have forgotten your power adaptor at your home. You have to work
on your laptop for a long time and you fear thatthe battery will collapse
before you finish.
Here are three tips for you for a
long battery timing of your laptop.
- Turn all unnecessary battery consuming hardware off.
It is a way to
save battery power by turning all your hardware off when you are not using it.
For example if you are working offline; you are making an assignment on
Microsoft Word, you are watching a movie, you are editing your videos or snaps,
you are drawing a painting etc which do not require internet connectivity or
you are on the place where there is no internet access. It’s better to turn
WLAN card of your laptop off. Similarly, if you have connected speakers to your
laptop through USB port for power supply, and any music or video is not running
on your laptop, it’s better to disconnect the speakers. Just remove or switch
off all hardware which is not in use. Remove connecter headset, USB etc. It
will make the battery of your laptop running for more time.
2. Turn
off all applications which are not being used.
There are some
applications which are always running on your computer while you are not
noticing it. For example, your Antivirus software is always in action whether
you need it or not. If you are working on your laptop alone and you do not need
to connect any third party flash drive to your laptop and you are not connected
to the internet as well, you don’t need antivirus software then at that
particular time. Just disable protection for the time you connect power supply
to your laptop. Similarly, switch off Bluetooth; quit Skype, and so on. Make sure
that the only application that is running on your computer is that on which you
are working.
3. Break
down additional functions.
It is better to
dim down the display of your laptop. I mean adjust screen brightness to a
minimum level which does not make you feel inconvenient. Set you power settings
to “Power Saver” power plan. Whenever you have to leave your laptop for a
while, lock the screen. Close the lid when you go away for some time and do not
want to shut down.
Hope now your
battery will keep running for longer time.
How to Lock Files and Folders without Installing any Third Party Application on Your Computer
It is sometimes advisable to lock
your personal data if you share your PC with your friends, family of colleagues.
One of the solutions is to hide your personal files and folders in your PC. But
what if the partner users of your PC know how to make hidden files and folders
shown? The problem of privacy protection remains
unsolved. It is better to protect your personal data with password security. There are many applications which allow the user set password on a file or folder but these applications are not good in term of simplicity and attraction for the user. So, there must be a method to lock files and folder without installing any third party application.
I searched for this kind of
method on the internet. After tremendous indulgent with various boring and undesirable
contents and methods, I finally found a solution. This method is quite easy and
simple.
Here is step by step procedure to
create your own locker for personal data security
cls
@ECHO OFF
title Folder Private
if EXIST "HTG Locker" goto UNLOCK
if NOT EXIST Private goto MDLOCKER
:CONFIRM
echo Are you sure you want to lock the folder(Y/N)
set/p "cho=>"
if %cho%==Y goto LOCK
if %cho%==y goto LOCK
if %cho%==n goto END
if %cho%==N goto END
echo Invalid choice.
goto CONFIRM
:LOCK
ren Private "HTG Locker"
attrib +h +s "HTG Locker"
echo Folder locked
goto End
:UNLOCK
echo Enter password to unlock folder
set/p "pass=>"
if NOT %pass%== pakistan753 goto FAIL
attrib -h -s "HTG Locker"
ren "HTG Locker" Private
echo Folder Unlocked successfully
goto End
:FAIL
echo Invalid password
goto end
:MDLOCKER
md Private
echo Private created successfully
goto End
:End
title Folder Private
if EXIST "HTG Locker" goto UNLOCK
if NOT EXIST Private goto MDLOCKER
:CONFIRM
echo Are you sure you want to lock the folder(Y/N)
set/p "cho=>"
if %cho%==Y goto LOCK
if %cho%==y goto LOCK
if %cho%==n goto END
if %cho%==N goto END
echo Invalid choice.
goto CONFIRM
:LOCK
ren Private "HTG Locker"
attrib +h +s "HTG Locker"
echo Folder locked
goto End
:UNLOCK
echo Enter password to unlock folder
set/p "pass=>"
if NOT %pass%== pakistan753 goto FAIL
attrib -h -s "HTG Locker"
ren "HTG Locker" Private
echo Folder Unlocked successfully
goto End
:FAIL
echo Invalid password
goto end
:MDLOCKER
md Private
echo Private created successfully
goto End
:End
Save the file as is shown in below pictures
Save the file at the location you want. When you will click on this newly saved batch file, a folder named "private" will be created at the same location. Move all your private data in this private folder.
Then click on the batch file again and a cmd window will open as shown in picture
type "y" and hit "Enter"
You will see that the "private" folder disappears. Don't fear, that folder will again appear when again click on batch file. when you click on batch file again the following window will open to let you enter your password
Type your password that is "12345" and hit enter. You will see that "private" folder instantly appears.
click on "private" folder to open it. Your personal data is present there. To lock the folder again exit "private" folder and click on the batch file. A cmd window will open. Type "y" and press "enter". Your "private folder disappears again.
To change your password, right click on batch file and select "edit" it will open in notepad. from there change your password.
Delete your current password which are "12345" and type your own password and save the file.
That's all...........
Note:
This
method is not yet completely secured and satisfactory. in Windows 7, the
files and folders you had put in "private" folder may appear in search
results and one can access this data from search outputs. Anyhow, when
you also hide the data in "private" foldrer, it is not indexed in search
result and one cannot access it through search outputs. The problem
still remained unsolved if your partner users of your PC set the
settings for hidden files to be shown. Sunday, 29 September 2013
How to Block Facebook or any Website on your PC

Step-1
Open and run “notepad” program on your computer.
You have to run it as administrator as shown in the picture below.
Right click on the icon of “notepad” a small menu will pop
out as shown in the picture below
Click on “Run
as Administrator” and a new small window will open and you will be prompted to
choose from “yes” and “No”. Choose “Yes” and proceed. May be you are asked to
enter Administrator password. Simply give your computer password and press
“OK”. Notepad will open with administrative rights as shown in the picture
below.
Step-2
Now, as the notepad is open with
administrative rights, choose a file to open. For this, click on “File” Button
in the menu. A dropdown menu will appear and choose “open” or when notepad
open, simply press “Ctrl+O”. It will open another window leading you to choose
the file you want to open as shown in the picture below.
Click
on Drive “C” it will make some folders appear in the main view of the window.
Then click on the folder named “Windows”. It will further open the content of
“windows” folder as shown in the picture below.
Now, scroll for the folder named
“System32”. Click on this folder and it will open showing its contents.
Now search “drivers” folder in this
window. When you find it, click on it and it will open showing its contents to
you.
When the contents of “drivers”
folder are open, you will find the same windows as shown in the picture above.
Click on the folder
titled “etc”.
You
may find the “etc” folder empty showing you the message “No items match your
search”. Don’t confused, just click on the dropdown menu titled “Text Documents
(*.txt)” and it will drop a small menu. From this menu select “All Files”. You
will see that the contents of “etc” folder are now shown in front of you.
Now click on the file named “hosts”. It will open in your
notepad program and the file selection wizard will disappear.
Step-3
Next Step is to insert the URLs of the websites you want to
block.
Just insert the
websites which you want to block on your PC or Laptop. Before inserting the
original web URL, just add “0.0.0.0” and give space, enter URLs as the picture
below shows and then press “Ctrl+S” or save the file from file button in menu to
save changes in the file.
That’s all. To unblock these websites, just repeat the whole
process and delete the entered websites and save the changes to file again. It
will unblock the websites.
NOTE
Sometimes it requires system reboot before the changes take
effect. Just check, if the websites still open, restart your system and then
check again. I am sure now the websites would have been blocked.
How to solve Folders Showing as Shortcuts, Hidden in USB/Memory-Card/HDD
By connecting flash drives to the affected computer, often it shows flash drive containing just some folder's shortcuts. Sometimes it shows nothing though drive's
properties show it has files in it. Even we get some inaccessible
folder or file. This type of problem may also seen in our local drives
(HDD partitions). Even paid anti-virus is unable to resolve those folders, they just scan and detect The AUTORUN worm which one will execute all programs. Then our important files remain hidden.Here we will see how can we solve this problem by using command line and batch file. Though the batch file is nothing but the executable file contains command lines. So solving the hidden and shortcut problem of USB or drives, we must have the administrator privilege as we will execute something.
Using Command line:
To solve/fix the folder's hidden or system file, the easiest way is to run a command line. You can apply this command to USB and local drive as well, need to change the drive_letter.
Go to Run, type cmd and hit enter. In command prompt just type:
And hit enter. Be sure you've typed the drive letter (e.g. j:,h: or D:) instead of "drive_letter" in the command line. My USB drive letter is J: and my command should looks like:
All files and folders will be normal and you should be able to delete the shortcuts, created by the virus.
Command line details: Here atrib=attribute, "-"=remove attribute/permits, h=hidden s=system, r=read-only, a=archive, /s=sub directory, /d=directory, drive_letter=the letter of the drive shown in windows explorer (e.g. j:,h: or D:) and *.* is called the wild card for all files.
If you don't like to be a "command Ninja" then see below.
USB, MicroSD, MiniSD or other Mmory Cards issue:
1. Connect your USB or memory card to the PC or laptop.
2. Copy these lines and paste it into a "new text file"
4. Save the text file as any_name.bat
5. Double click on the any_name.bat file and it will run in the command prompt and see the hidden files/folders come back.
6. Delete the shortcuts and unnecessary files and folders from USB drive.
2. Save the text file as a bat file (example: any_name.bat)
3. Run this bat file by double-clicking on it.
Thus you can solve this kind of problems with a *.bat file. You can save the *.bat file for solving this hidden problem.
Important: These tutorials are applied for Windows 7/Vista/xp. You must have the administrative privilege to run the command or execute the .bat file. Put the " : " after the j, k, or D (drive letters). These commands are not case sensitive.
To solve/fix the folder's hidden or system file, the easiest way is to run a command line. You can apply this command to USB and local drive as well, need to change the drive_letter.
Go to Run, type cmd and hit enter. In command prompt just type:
attrib -h -s -r -a /s /d drive_letter:\*.*
![]() |
| Commands for un-hide files/folders |
All files and folders will be normal and you should be able to delete the shortcuts, created by the virus.
Command line details: Here atrib=attribute, "-"=remove attribute/permits, h=hidden s=system, r=read-only, a=archive, /s=sub directory, /d=directory, drive_letter=the letter of the drive shown in windows explorer (e.g. j:,h: or D:) and *.* is called the wild card for all files.
If you don't like to be a "command Ninja" then see below.
USB, MicroSD, MiniSD or other Mmory Cards issue:
1. Connect your USB or memory card to the PC or laptop.
2. Copy these lines and paste it into a "new text file"
@echo off
attrib -h -s -r -a /s /d drive_letter:\*.*
3. In the 3rd line give the drive letter name (Example: J or K or L etc.) instead of "drive_name"4. Save the text file as any_name.bat
5. Double click on the any_name.bat file and it will run in the command prompt and see the hidden files/folders come back.
6. Delete the shortcuts and unnecessary files and folders from USB drive.
Local drive issue:
1. Copy these lines and paste it into a "new text file"
@echo off
attrib -h -s -r -a /s /d D:\*.*
attrib -h -s -r -a /s /d E:\*.*
attrib -h -s -r -a /s /d F:\*.*
attrib -h -s -r -a /s /d G:\*.*
attrib -h -s -r -a /s /d H:\*.*
attrib -h -s -r -a /s /d I:\*.*
attrib -h -s -r -a /s /d J:\*.*
@echo complete.
2. Save the text file as a bat file (example: any_name.bat)
3. Run this bat file by double-clicking on it.
Thus you can solve this kind of problems with a *.bat file. You can save the *.bat file for solving this hidden problem.
Important: These tutorials are applied for Windows 7/Vista/xp. You must have the administrative privilege to run the command or execute the .bat file. Put the " : " after the j, k, or D (drive letters). These commands are not case sensitive.
How to Fix USB or Memory Card Showing Shortcuts
Your USB or other memory drive like memory card sometimes shows
shortcuts when connected to a
computer. Your all files in that drives are shown
as only shortcuts and you get worried about your precious data on your flash
drive. It is disgusting to have such irritating problems in transferring data
through USB.
Never mind, the data remains there in your flash memory
drive but it is hidden due to auto generated attributions to those files and folders.
It is mostly caused by virus infected computers
which have such executable files that create shortcuts in the USB while applying special attributes to the files and folders in it and as a result the original files and folders instantly disappear and only shortcuts are visible.
Don’t worry; here is the reliable solution to this problem.
When you connect your USB to a virus infected computer that
creates shortcuts, shortcuts are created and if you apply this solution on the
same computer, it may not really benefit you. Just remove your USB from that
computer and connect to other one. Then apply this method and you will be happy
again.
Procedure:
Open notepad of your computer and write the following code
into it:
@echo off
attrib -h -s -r -a /s /d G:\*.*
Note: The letter “G” in the code above is the drive letter
of your USB. You can replace “G” with your original drive letter of your USB on
your computer. For Example if your drive letter is “I” then your code will be
@echo off
attrib -h -s -r -a /s /d I:\*.*
Save this file as batch file as shown in the pictures below
Give it name whatever you want like “Shortcut solver” etc and put “.bat” at the end of the name and click save as shown in the picture below
It is now your shortcut solver software. Just connect your
infected flash drive/USB with your computer. And click on this saved batch
file. Now open your USB, How is that?
Your original files and folders are back. Just delete the
shortcuts. That’s all.
Note: It happens sometimes that whenever you connect another
USB/flash drive, the drive letter is changed for that removable drive. Don’t worry.
Just right click on your saved batch file, select edit and change the drive
letter and save the file.
Warid Best Calling Package : Free Calls 24 Hours a Day at Rs. 4.99/day

Warid introduces a new LBC offer that allows Warid subscribers to make
unlimited Free Calls (24 hours a day), from their city to any Warid
number in Pakistan and they can also make calls to all other networks
and landline numbers at the Lowest call rates.
Offer Details:
Offer Details:
- On-net calls FREE, 24 hours a day
- Off-net calls @ Rs. 0.02/sec, 24 hours a day
Charges:
- Dailly Charges Rs. 4.99
- Every SMS sent to 4337 will be charged @ Re.1
Activation:
- To activate, SMS “BOL” to 4337
- Call 100 for details
Un subscribtion:
- To de-activate, SMS “BOL<space>OFF” to 4337
City List:
- This offer is currently available only for Multan, Hyderabad and surrounding cities. City list is providedhere.
Terms and Conditions:
- Offer is only available on Minute Package.
- Offer will be automatically re-subscribed at midnight. In case user’s balance is below the required level, the offer will be un-subscribed
- In case of no subscription, charges for Minute Package will be as follows:
- All on-net and off-net (mobile & landline) calls @ Rs. 1.20+tax (11:00 pm to 4:59 pm)
- All on-net and off-net SMS @ Re. 1+tax (24 hours)
- This is a limited time offer
Jazz, Ufone, Warid, Zong SMS Packages Daily, Weekly, Monthly Information
Daily SMS Bundle
Daily Bundle 1
Offer Details
Daily Bundle 1 is available in Rs 1.5 with 150 SMS for 1 Day
This offer is for limited time only
Applicable to all local networks
Periodic subscription
19.5% tax applies
Machines
Action Item Code
Subscription *106*1#
Un-subscription *106*4#
How to check Jazz Remaining SMS through Code then click here and get Detali…
___________________________________________________________________________________
Daily Bundle 2___________________________________________________________________________________
Offer Details
Daily Bundle 2 is available in Rs 3.99 with 500 only valid for 1 Day
This offer is for limited time only
Applicable to all local networks
Periodic subscription
19.5% tax applies
Machines
Action Item Code
Bundle Info *101*3*01#
Subscription *101*1*01#
Free SMS balance Inquiry *101*2*#
How to Unsubscribe Jazz SMS Packages Daily, Weekly then click here and get detail…
___________________________________________________________________________________
Weekly SMS Bundle___________________________________________________________________________________
So you love to SMS but don’t want to pay more than you need. Subscribe to our weekly bundle to suit your needs.
Offer Detail
Weekly Bundle is available just for Rs 6.99 and 1,200 sms can be avail in 7 Days
This offer is for limited time only
Applicable to all local networks
19.5% tax applies
Machines
Code
Bundle Info *101*3*07#
Subscription *101*1*07#
Free SMS balance inquiry *101*2#
To Find Few other Jazz SMS Bundles click here and get information…
___________________________________________________________________________________
Monthly SMS Bundle___________________________________________________________________________________
If SMS is the core of you existence, we have just the right offer for you.
Offer Detail
Monthly Bundle available Rs 80 with 8,000 Sms limit in 30 Days
This offer is for limited time only
Applicable to all local networks
19.5% tax applies
Machines
Code
Bundle Info *101*3*02#
Subscription *101*1*02#
Free SMS balance inquiry *101*2#
Information about Jazz Jazba Offers win Free Calls, SMS, Internet To New Customers 2013 click here and get detail..
Ufone Monthly SMS,MMS & Internet Offer for Rs. 250/-
Warid SMS Bundles, Daily and Weekly Packages

Warid SMS Bundles - Warid Telecom offers daily and weekly SMS bundles for prepaid subscribers. Daily package includes 500 SMS for Rs 3.5+tax and Weekly package is 1000 SMS for Rs 6.99+tax. Prepaid subscribers can activate these packages by sending 'DS' for daily and 'WS' for weekly packages. SMS bundles are automatically subscribed again once validity is completed.
How to Subscriber Warid SMS Packages
Daily SMS Bundle, write “DS” and SMS to 3333.
Weekly SMS Bundle, write “WS” and SMS to 3333.
How to Unsubscriber - Deactivate
Daily SMS Bundle, write “SMS off” and SMS to 3333.
Weekly SMS Bundle, write “SMS off” and SMS to 3333.
More Details
This is a limited time offer & only for Prepaid subscribers.
SMS bundles are automatically subscribed again once validity is completed.
In case of rental failure, SMS bundle will be de-activated.
All charges include government taxes and levies as well as a 19.5% federal excise duty.
Each recharge done through scratch cards and Warid Ezeeload includes 10% withholding tax.
Using SIMs without proper documentation is a crime – PTA
Zong SMS Packages
Daily SMS Package
100 MMS 500 SMS Rs. 3.99
For Subcribe Write Sub Send To 700 And Follow The Following Bundles.
Daily SMS Package
500 SMS Rs. 2.50 For Subcribe Dial *704#
Weekly SMS Package
1000 SMS Rs. 10 For Subcribe Write Sub Send To 700 And Follow The Following Bundles.
FortNightly SMS Package 500 SMS Ever Day For 15 Days Rs. 50 For Subcribe Write Sub Send To 700 And Follow The Following Bundles.
Monthly SMS Package
500 SMS Every Day For 30 Days Rs. 80 For Subcribe Write Sub Send To 700 And Follow The Following Bundles.
Subscribe to:
Posts (Atom)